[SP] Withdrawal Symptoms
Quote from Djinndrache on January 26, 2012, 9:20 amThere have been some updates since I posted my blindrun, so I played all the mappack again (including some new maps). I'm impressed by the last map!
fApQ9Y6RGNM
(Link: http://www.youtube.com/watch?v=fApQ9Y6RGNM)
There have been some updates since I posted my blindrun, so I played all the mappack again (including some new maps). I'm impressed by the last map!
fApQ9Y6RGNM
(Link: http://www.youtube.com/watch?v=fApQ9Y6RGNM)
Portal 2 Playlists: videos 1-200 | videos 201-400 | videos 401-600 | videos 601-800 | videos 801-1000 | videos 1001-1200
Quote from silic on January 26, 2012, 1:20 pmi see from your blindrun that all the hints have failed in the first map...
Just for anyone who downloads these map packs the script is roughly as follows:
Welcome to withdrawl symptoms map pack
you are currently in a interchamber lock
On the wall you will see the test number
Below that is which porals you will be able to place or manipulate
To start the level, stand in the highlighted circle
Once inside it will turn green, and the level will begin.
Thats enough talking, Go have fun!Thank you for the blind run again on the new level. I wasnt as happy with this level as i was with the rest, however i have decided to keep it as it stands.
Andyb: Thank you for your comments
appreciated the kind feedback!
This however, is the last in the mappack i feel. i may continue this, however i have currently a new project underway, which hopefully will blow these maps out of the water. This mappack has been a experience, and what a ride! First maps ive released, and such great feedback. makes me proud to be on these forums providing maps for you all.
i hope not to disapoint on my latest project which may be out within a month.
Silic
i see from your blindrun that all the hints have failed in the first map...
Just for anyone who downloads these map packs the script is roughly as follows:
Welcome to withdrawl symptoms map pack
you are currently in a interchamber lock
On the wall you will see the test number
Below that is which porals you will be able to place or manipulate
To start the level, stand in the highlighted circle
Once inside it will turn green, and the level will begin.
Thats enough talking, Go have fun!
Thank you for the blind run again on the new level. I wasnt as happy with this level as i was with the rest, however i have decided to keep it as it stands.
Andyb: Thank you for your comments ![]() appreciated the kind feedback!
appreciated the kind feedback!
This however, is the last in the mappack i feel. i may continue this, however i have currently a new project underway, which hopefully will blow these maps out of the water. This mappack has been a experience, and what a ride! First maps ive released, and such great feedback. makes me proud to be on these forums providing maps for you all.
i hope not to disapoint on my latest project which may be out within a month.
Silic
Withdrawal Symptoms - V2.0.3 (community round-up // 1500 downloads)
Your choice - V2.0 (community round-up // 1000 downloads)
Too Many Variables - V1.0
Work in progress
Project Upgrade
Quote from andyb on January 26, 2012, 2:40 pmI did finish through 6 thou.Came back after a few and looked at it again then banged my head off the desk asking why I'm so dumb lol.
Cant wait for the next one
Edit:Hints worked fine for me by the way
I did finish through 6 thou.Came back after a few and looked at it again then banged my head off the desk asking why I'm so dumb lol.
Cant wait for the next one
Edit:Hints worked fine for me by the way
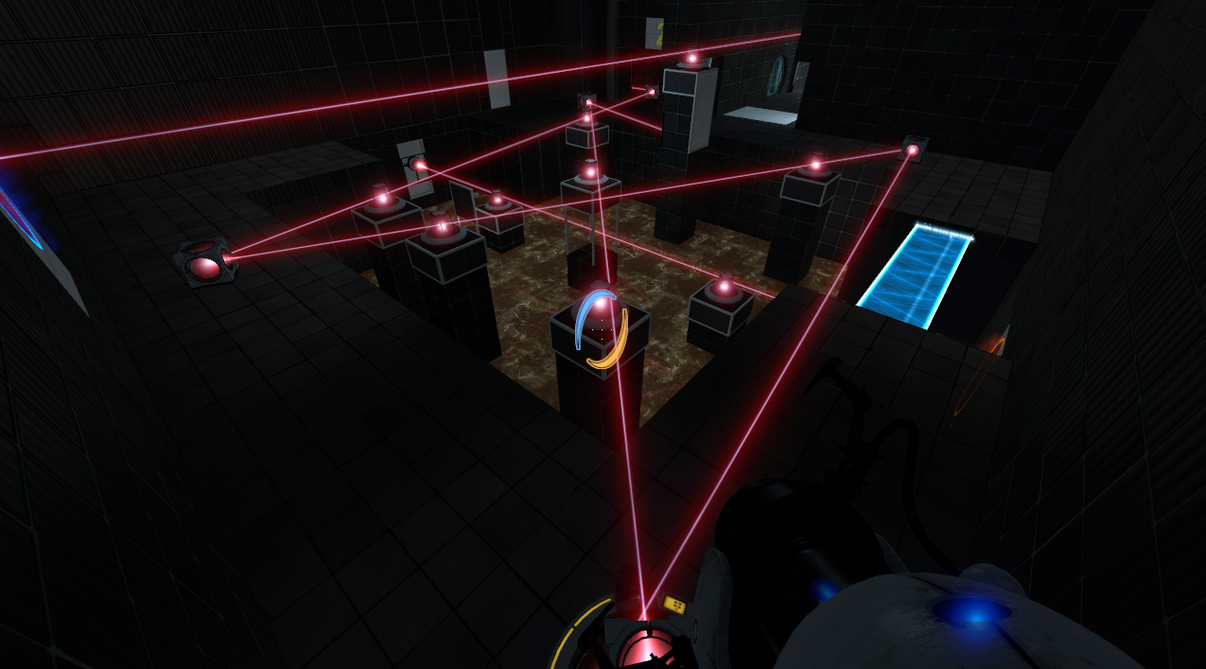
Quote from PCdoc on January 31, 2012, 5:05 pmHere is my solution the the laser room from Hell in Map 6.
Crazy, dude . . . I loved it.In fact, maps 5 and 6 were a blast - the only thing I was unsure of was the number that corresponded to the side-by-side fizzlers. There are 4 of them but there are only 3 numbers listed.
Also I did not know for sure what opened the door since - unlike the Hallway of fizzlers - it had no numbers. I guess the one X was OK - I know now that is represented ALL of the spinners.
Made sense. Still it would be cool if it had numbers above it.[spoiler]
Solution-1.jpg[/spoiler]
Here is my solution the the laser room from Hell in Map 6.
Crazy, dude . . . I loved it.
In fact, maps 5 and 6 were a blast - the only thing I was unsure of was the number that corresponded to the side-by-side fizzlers. There are 4 of them but there are only 3 numbers listed.
Also I did not know for sure what opened the door since - unlike the Hallway of fizzlers - it had no numbers. I guess the one X was OK - I know now that is represented ALL of the spinners.
Made sense. Still it would be cool if it had numbers above it.
Quote from silic on January 31, 2012, 5:22 pmlol,
the hallway of fizzlers runs in chronological order left to right, front to back.
so 1 3 5 (i think the numbers are) 1 will be the first fizzler, 3 the next, and so on. The last fizzler has a indicator going to it from the catcher.
i see your point tho, and i might correct this.
as to your solution (and others it seems) there are a few available. Easiest by far would be the intended solution in my eyes. just because there is far less moving of cubes you have to do...
Cheers for the small feedback. Appreciated!
[spoiler]clicky link as its larger than 800 bits wide lol.. --- http://i26.photobucket.com/albums/c106/ ... riplol.png
Small bit of information. That was the origonal concept screenshot before i finished the map, at that point there was no extra room to get 2 cubes and there was no way to actually complete the map in that you couldnt get the cubes over to the other side without cheating. This was rectified in the end obviously (Look at the wall behind the laser... i just chucked it in to see if the idea would work)[/spoiler]
lol,
the hallway of fizzlers runs in chronological order left to right, front to back.
so 1 3 5 (i think the numbers are) 1 will be the first fizzler, 3 the next, and so on. The last fizzler has a indicator going to it from the catcher.
i see your point tho, and i might correct this.
as to your solution (and others it seems) there are a few available. Easiest by far would be the intended solution in my eyes. just because there is far less moving of cubes you have to do...
Cheers for the small feedback. Appreciated!
Small bit of information. That was the origonal concept screenshot before i finished the map, at that point there was no extra room to get 2 cubes and there was no way to actually complete the map in that you couldnt get the cubes over to the other side without cheating. This was rectified in the end obviously (Look at the wall behind the laser... i just chucked it in to see if the idea would work)
Withdrawal Symptoms - V2.0.3 (community round-up // 1500 downloads)
Your choice - V2.0 (community round-up // 1000 downloads)
Too Many Variables - V1.0
Work in progress
Project Upgrade
Quote from McMaster on February 3, 2012, 4:41 pmHey silic!
Here is my solution for chamber 6
[spoiler]Needed the cube on the far left to jump in the orange portal to the exit.
http://i.imgur.com/JA6NY.jpg[/spoiler]Thanks for the map pack!
Hey silic!
Here is my solution for chamber 6
http://i.imgur.com/JA6NY.jpg
Thanks for the map pack!
Quote from Instantiation on February 4, 2012, 9:56 pmNeat. I especially liked the sixth map. I didn't finish all in one sitting, which was probably a huge help.

I wasn't sure what I was supposed to do to activate the second laser sensor. Was this what you had in mind? http://i.imgur.com/cl8Ac.jpg
And, just for comparison, my solution for the final laser setup.
006 Details
[spoiler]After a while, I stopped trying to activate 1,3, and 5 at the same time (before getting the two cubes) and just triggered the first two, placed the portal as far forward as possible, turned off the third grid, walked through & moved the portal, then unblocked the laser and collected the cubes (which I had already moved down to ground-level.Then, when I had each cube, I figured out pretty quickly that I needed every single switch tripped to open the last door.[/spoiler]
Also, the look of the maps is great.
The tutorial notes worked fine, but I they were a little slower than I'd like.
Neat. I especially liked the sixth map. I didn't finish all in one sitting, which was probably a huge help.
I wasn't sure what I was supposed to do to activate the second laser sensor. Was this what you had in mind? http://i.imgur.com/cl8Ac.jpg
And, just for comparison, my solution for the final laser setup.
006 Details
Then, when I had each cube, I figured out pretty quickly that I needed every single switch tripped to open the last door.
Also, the look of the maps is great.
The tutorial notes worked fine, but I they were a little slower than I'd like.

Quote from silic on February 5, 2012, 11:15 amInstantiation wrote:I wasn't sure what I was supposed to do to activate the second laser sensor. Was this what you had in mind? http://i.imgur.com/cl8Ac.jpgCorrect, that is how I intended the solution to look like.
Correct, that is how I intended the solution to look like.
Withdrawal Symptoms - V2.0.3 (community round-up // 1500 downloads)
Your choice - V2.0 (community round-up // 1000 downloads)
Too Many Variables - V1.0
Work in progress
Project Upgrade
Quote from Bokkie on February 5, 2012, 12:29 pmNow this is a mappack !!
Enjoyed it a huge dealJust some questions/remarks :
Is the walktrough video for room 4 (on page 3 of this topic) the intended solution?
[spoiler]To drop the redirecting cube above the laser and then quickly shoot a portal[/spoiler]Room 5 made me look again to the same walktrough video because I had no clue were to start.
[spoiler]Shooting the portal above the fizzling screen.[/spoiler]
Once that was clear it was nothing but funRoom 6 took me a while to figure out the right placing..
Once they're all setup, the "blue X" on the door doesn't change into a "yellow V" although the door opens..
Now this is a mappack !!
Enjoyed it a huge deal ![]()
Just some questions/remarks :
Is the walktrough video for room 4 (on page 3 of this topic) the intended solution?
Room 5 made me look again to the same walktrough video because I had no clue were to start.
Once that was clear it was nothing but fun
Room 6 took me a while to figure out the right placing..
Once they're all setup, the "blue X" on the door doesn't change into a "yellow V" although the door opens..