Portal 2 Timers example
Uploaded September 29, 2012 by josepezdj
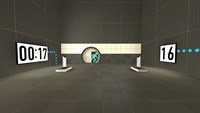
Description=================== Portal 2 timer examples =================== This is just an example map that includes the basics of 2 working timers (a countdown and a countup) that uses custom materials (numbers). The intention is to show the required entities and their inputs/outputs to understand the logic behind a timer made in the hammer editor. Also this method allows you the posibility to use your own custom typo/numbers to fit your map's aesthetics... For this example I used the typo "DIN Next LT Pro Condensed", because I think it's pretty much similar to the typo used by Valve for the signage lightboard; so if you are too lazy to make your own material and want to use it in a normal Portal2 map, it'll look good. So the purpose for this could be considered as merely didactic The basic idea under this method is to make an overlay with 10 frames (the ten numbers, from 0-9) and go changing its textureindex with the entity "env_texturetoggle". HOW TO MAKE YOUR OWN CUSTOM NUMBERS ---------------------------------------------------------------- 1. Open an image editor of your choice, take the font that you like and make 10 separate images, one per number (from 0 to 9), and REMEMBER to always give the image a size which values are a power of 2 (like 128x256 that I gave in this case). I prefer making .png files... you can do .tga as well... Whatever format that allows you recording an alpha channel (transparency) because this way, our numbers overlays would be stickable on whatever texture 2. Name each of them with a name followed by a suffix like "_0", "_1", "_2", and so on... Obviously, try to make that suffix coincides with the number into the image... lol. 3. Now open VTFEdit (http://nemesis.thewavelength.net/index.php?c=178) and go to File > Import. Now select at the same time (holding Ctrl or Shift keys down) all the ten image files. Do not resize the images. You can check into the "info" tab how the file contains 10 frames (each of them is a different number). I also made a cutie dots (":") to separate the seconds from the minutes and make them flicker: for this you need to make 2 textures, one with the dots and other completely empty but with the same size, then do the same as for the numbers, import them with VTFEdit selecting both at the same time. 4. Then save this file as .vtf into your "materials" folder (you can create whatever folder of your choice into /materials of course) giving it a whatever name. 5. Now you should create the .vmt file for the above .vtf file. Both names must be the same, only their extensions change... In this example, my .vmt file contains the following: UnlitGeneric { $baseTexture "josepezdj/numbers/black_numbers" $surfaceprop glass $translucent 1 "%keywords" portal $decal 1 Proxies { ToggleTexture { toggleTextureVar $baseTexture toggleTextureFrameNumVar $frame toggleTextureShouldWrap 0 } } } You can simply copy all that only replacing the path "josepezdj/numbers/black_numbers" by the one where your .vtf file is located and the name of your file. I guess it's clear. However, do not hesitate to ask whatever question or doubt Once created your custom texture for the ten numbers, check inside the attached .vmf in your hammer editor to see how you can set the timers up easily. Read the Readme.txt file for instructions info. A further post with an explanation in detail about how the timer system works is in the topic of this download, for those who doesn't really extract much info from the vmf file... josepezdj Details |